Please wait...
How to Attach the 3603 Top Fixed Bracket to the Silent Gliss 1080 Curtain Track: A Step-by-Step Guide
This entry was posted 10/06/2024
When it comes to creating the perfect window treatment, precision and ease are key. The Silent Gliss 1080 curtain track, known for its smooth operation and sleek design, offers a perfect solution for any space. However, attaching the 3603 top fixed bracket to the Silent Gliss 1080 can be a bit tricky if you're not familiar with the process. In this guide, we’ll walk you through the steps to ensure a secure and professional installation, making it easier for you to enjoy your made-to-measure curtain track system.
Why Choose Silent Gliss Curtain Tracks?
Before diving into the installation process, let’s highlight why Silent Gliss curtain tracks are a top choice for many homeowners and interior designers:
Smooth Operation: Silent Gliss tracks are renowned for their silent and effortless glide, ensuring your curtains open and close seamlessly.
Customisable: These tracks can be made to measure, fitting perfectly into any space, no matter the size or shape of your windows.
Durability: Made from high-quality materials, Silent Gliss tracks are built to last, providing reliable performance for years to come.
Tools You'll Need
To attach the 3603 top fixed bracket to the Silent Gliss 1080, you’ll need the following tools:
- Small screwdriver
- Silent Gliss 1080 curtain track
- 3603 top fixed bracket
Step-by-Step Installation Guide
1. Prepare Your Tools and Materials
Ensure you have all your tools and materials at hand. Having everything prepared will make the process smoother and more efficient.
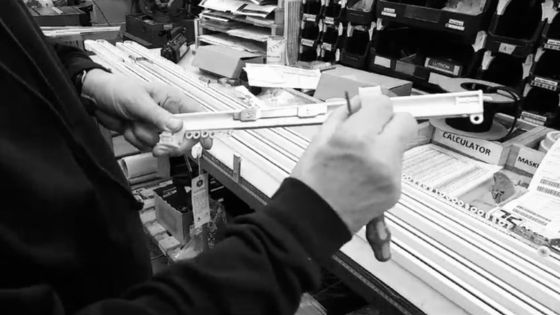
2. Attach the Bracket to the Track
The first step is to attach the 3603 bracket to the back of the Silent Gliss 1080 track. This is where it can get a bit tricky, but with careful handling, it becomes straightforward.
3.Position the Bracket
Place the bracket onto the back of the track. Hold it firmly to ensure it stays in place.
4. Insert the Screwdriver
Take a small screwdriver and insert it through the hole in the bracket. This will help you apply the necessary pressure to secure the bracket.
5. Secure the Clip
While the screwdriver is in place, push on the clip. You should hear a satisfying click, indicating that the bracket is now securely attached to the track.
6. Verify the Attachment
Give the bracket a gentle tug to ensure it is securely attached. It should be nice and solid, ensuring the track is firmly held.
Pro Tip: Pre-Attach Brackets Before Ceiling Installation
It’s much easier to attach all the brackets to the track before you fix the track to the ceiling. This saves time and ensures a more straightforward installation process. Simply repeat the above steps for each bracket, then proceed with attaching the track to the ceiling.
How to Remove the Bracket
If you need to remove the bracket for any reason, follow these steps:
1. Insert the Screwdriver
Insert the small screwdriver through the hole again.
2. Push Down on the Lever
Push down on the lever to release the clip. This should disengage the bracket from the track.
3. Detach the Bracket
Gently pull the bracket away from the track.
By following these steps, you can easily install and adjust your Silent Gliss 1080 curtain track with the 3603 top fixed bracket. Enjoy the seamless operation and elegant appearance that Silent Gliss systems bring to your home.
Installing a Silent Gliss 1080 curtain track with a 3603 top fixed bracket doesn’t have to be daunting. With the right tools and a bit of patience, you can achieve a professional and secure installation. Remember, these tracks are made to measure, ensuring a perfect fit and smooth operation for your curtains. Whether you’re a DIY enthusiast or a professional installer, these tips will help you get the job done right. Happy installing!
This entry was posted on 10/06/2024
