Please wait...
How do I Measure a Circular Bay Window?
This entry was posted 27/06/2013

We’ve given advice in the past about how to measure your bay windows, but admittedly, some are more complicated than others. One of our customers from the USA has been asking for advice on how to measure a round bay. It might seem difficult, but it’s probably not as complicated as you think.
If you’re after a new curtain track and have been wondering how to take the measurements, have a look at our simple instructions.
Step 1 – Work at the Right Height
Before you start measuring, you need to make sure you can reach properly. You can’t measure the bay at floor level in case the walls aren’t perfectly straight, so get up to the height where the curtains will be fixed. Be safe, though – make sure whatever you stand on is sturdy and secure. A step ladder is probably the best bet (or ask someone tall to help).
Step 2 – Measure Across the Bay
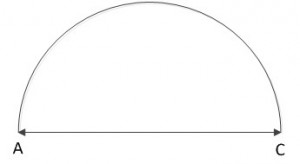
Now you can actually begin taking measurements. Firstly, measure across the bay from corner to corner, in a straight line (A to C).
Step 3 – Measure at Right Angles
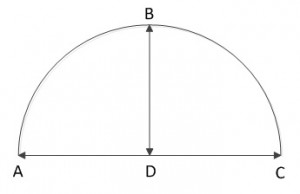
Next, measure from the centre of your A to C line (D) to the middle of the curved wall (B). You may want to mark point B with a drawing pin or Blu-Tack as you’ll be measuring to this point again later.
Step 4 – Double Checking
The two measurements you’ve taken so far are technically enough for us to bend the track or pole, but we also like extra measurements to double check. That way, you can be sure everything will fit.
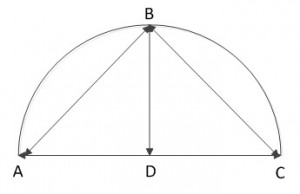
The best measurements for this are from the corners of the bay to the centre of the curve (A to B and B to C). Don’t worry if these measurements aren’t quite the same – we can still work with them to map out the design.
Step 4 – Reverse Bends (Optional)
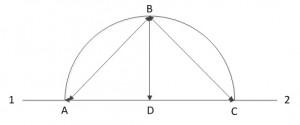
If you want your curtain rod to start and end at points A and C, that’s all you need. However, sometimes it’s nice to have ‘reverse bends’ at one or both ends i.e. the pole turns a corner and comes out of the bay.
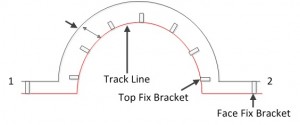
If that’s the case, simply measure from points A and C to where you’d like the track to end (1 to A and 2 to C).
Step 5 – Brackets
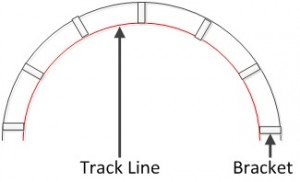
Those are all the measurements we need to shape your bay window curtain pole, but we also need to know how you intend to fix it in place. If you are ‘face fixing’ (i.e. attaching it to the wall), we need to make an allowance for brackets so everything will fit properly.
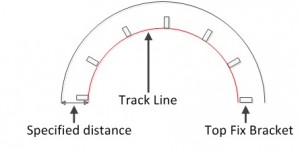
If you’d like the track to be top fixed (i.e. to the ceiling), let us know how far from the wall you’d like it to be.
If the track or pole is to have reverse bends, you could even use a combination of both top and face fix brackets.
Still have questions? We’ve got the answers. Just get in touch and we’ll talk you through the whole process.
This entry was posted in Bay Window Curtain Tracks, Bay Window Curtain Poles and tagged round bay windows, curtain tracks for bay windows, curtain poles for bay windows, circular bay windows on 27/06/2013

