Please wait...
Can You Change the Side of Your Overlap Arm on Your Silent Gliss Curtain Track?
This entry was posted 27/10/2024

Changing the overlap arm on your Silent Gliss curtain track may seem daunting, but it’s a quick and easy process if you know the steps. Whether you're adjusting the overlap for aesthetic reasons or to improve functionality, you can accomplish this with minimal tools and effort. Below, we’ll guide you through the steps to change the side of your overlap arm and explain why you might want to do this in the first place.
Understanding the Overlap Arm on a Silent Gliss Curtain Track
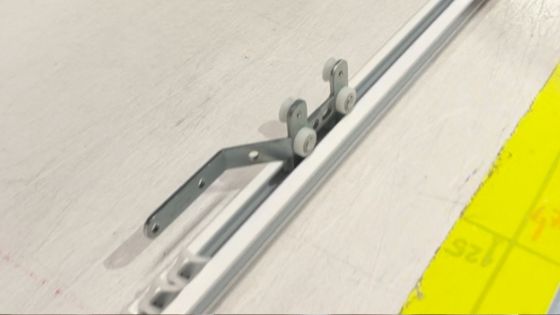
First, let’s clarify what an overlap arm is and its purpose. The overlap arm is a small but essential component on your curtain track that ensures curtains can overlap at the centre where they meet. This overlap creates a seamless look, blocking out light and closing any gaps that might otherwise let light in or reduce privacy.
With Silent Gliss tracks, the overlap arm can be positioned on either side of the curtain track. Some people prefer the arm on the left, while others want it on the right—this flexibility allows for customisation based on the room layout or how the curtain operates best for you.
Why Change the Side of the Overlap Arm?
In most installations, the overlap arm is placed on the right side, allowing curtains to draw from right to left. However, there are several reasons you might want to change the overlap arm's position:
-
Room Configuration: If there’s a wall, furniture, or other obstruction on the right side of the track, drawing the curtain from left to right could be more convenient.
-
Single Curtain Use: For single curtains, especially in rooms where only one side is used or preferred, positioning the overlap arm on the left can improve function and aesthetics.
-
Ease of Access: In some cases, people find it easier to operate curtains with the overlap arm on a particular side, especially if a corded track is used.
-
Handedness or Preference: If you're right or left-handed, this might influence which side feels more natural for operating your curtain track.
Tools You’ll Need
To switch the overlap arm, all you need is a small Phillips or flathead screwdriver. This tool will help you remove the end cap and make any adjustments with ease.
Step-by-Step Guide to Changing the Side of Your Overlap Arm
Follow these steps to adjust the overlap arm from the right side to the left on a Silent Gliss curtain track:
-
Remove the End Cap:
- Using a small screwdriver, gently unscrew and remove the end cap on the side where the overlap arm is currently located. Set the cap and screws aside safely to avoid misplacing them.
-
Remove the Gliders:
- Slide the curtain gliders off the track, allowing you to access the overlap arm without any obstructions.
-
Detach the Overlap Arm:
- Carefully remove the overlap arm from its current position by sliding it out of the track.
-
Flip the Overlap Arm:
- Turn the overlap arm over and slide it into the opposite end of the track, facing in the direction you want it to.
-
Replace the Gliders:
- Once the overlap arm is in place, reattach the gliders by sliding them back onto the track.
-
Reattach the End Cap:
- Position the end cap back onto the end of the track and secure it with the screws you set aside earlier.
-
Test the Curtain Operation:
- After securing everything in place, test the curtain to make sure it glides smoothly and that the overlap covers any gaps effectively.
Benefits of Customising the Overlap Arm Position
Adjusting the overlap arm lets you tailor the curtain operation to your specific needs. For example:
- Better Coverage: With the overlap arm positioned as you prefer, curtains can fully cover the window area, ensuring privacy and better insulation.
- Enhanced Aesthetics: Curtains that meet seamlessly at the centre create a polished look and prevent light from peeking through any gaps.
- Improved Accessibility: With the overlap arm positioned on the more accessible side, it’s easier to operate the curtains, especially for those with specific accessibility needs or handedness preferences.
FAQs about Changing the Overlap Arm on Silent Gliss Curtain Tracks
1. Can I change the overlap arm without removing the whole curtain track?
- Yes, you only need to remove the end cap and the gliders, not the entire track, making this a quick and easy adjustment.
2. Is this adjustment possible on all Silent Gliss curtain tracks?
- Most Silent Gliss tracks allow for this change, but it’s best to consult your track’s specific manual to confirm compatibility.
3. Do I need to lubricate the track after changing the overlap arm?
- While not required, adding a small amount of track lubricant can help maintain smooth gliding action after any adjustment.
4. How can I ensure the overlap arm is securely reattached?
- After positioning the overlap arm on the other side, make sure it’s properly seated in the track before replacing the end cap.
5. What if I’m using a corded Silent Gliss track?
- Changing the overlap arm position on a corded track can be done in the same way, but consider which side will make the cord operation more convenient for you.
6. Can I adjust the overlap arm if I have a single curtain setup?
- Absolutely. For single curtain installations, adjusting the overlap arm to one side can enhance both the curtain’s look and functionality.
Changing the side of your Silent Gliss overlap arm is a quick adjustment that offers substantial benefits in convenience, coverage, and appearance. Whether you're customising the track for a room’s specific layout or simply to improve usability, this minor modification is a simple, practical solution.
This entry was posted on 27/10/2024

